「Understanding Darwinia 1–5」A Hands-on Guide on How to Run a Bridger Node

In a previous article, we have introduced our new design of a relayer fee market, which provides users with a new way of participating to earn in the Darwinia ecosystem. As the release of Bridger is just around the corner, we make a tutorial on how to run your own Bridger node to help get you familiar with the process.
Relayers (aka. Bridgers) in Darwinia Network are offchain worker clients which relay the headers and messages between the source chain and the target chain. They have access to both chains and transfer data in two directions. Darwinia Bridger is an implementation of the relayer client written in Rust. Following are the steps of installation and configuration on a Substrate-to-Substrate bridger.
DISCLAIMER: There is a possibility that you lose your assets due to many factors. Do your research and participate at your own risk. We strongly advise you to test-run on the Pangolin-Pangoro test bridge before going to the mainnet bridge.
Prerequisites
There are some skill requirements for running a bridger node. If you are Darwinia/Crab validator, you’ve already had the skill set. You can use the following checklist as a reference.
- Basic Linux/Unix commands
- Basic Docker operation
- Concepts of private keys, public keys and accounts in blockchains
- Able to sign and submit an extrinsic on Substrate-based blockchains
Overview
To successfully run a bridger node, you will go through many steps. We present a big picture here with the rationale behind these steps for your reference. The detailed manual will be in the next section.
A bridger connects to both the source and target chains and submits transactions/extrinsics to both networks, so you need an account for each network. The private keys to your accounts will be set in the configuration file.
The relayer will be rewarded for its work and punished(slashed) for failing to accomplish the task. Therefore, the account holder should lock some collateral and enroll as a relayer on both chains, which can be done by submitting an extrinsic(enrollAndLockCollateral) on both chains.
You need to run and maintain a bridger node, either locally or on a cloud machine, to be able to do the actual work. You can either build your own executable from the source code or use the docker image.
When running your relayer node, you can choose from different strategies. Some strategies depend on the data of realtime transaction fees. You need to apply for access tokens to request such data from oracles.
Steps
Preparing Accounts
We recommend the chrome extension Polkadot{.js} and the command line tool subkey for the management of your account. A detailed tutorial on this topic can be found on our documentation website.
Let’s create a Substrate account from a 12-word mnemonic phrase in Polkadot{.js}. Meanwhile write down the mnemonic phrase for the generation of the private key in later steps. You can use an account for both networks or create one for each network. Here we create different accounts for different networks.

Suppose we have used Polkadot{.js} to create an account account1 with a mnemonic phrase mnp1 for the Pangolin network. Use the command line tool subkey to obtain the corresponding private key prvt1. A private key(prvt1 and prvt2) is a 256-bit number with the format of “0x….”. The Secret seed part is what we call a private key.

You can see the address to your account when connecting to the designated network. addr1 starts with '5' and addr2 starts with '2'. You will need these addresses when applying for test tokens.
Applying for Test Tokens & Subscan API Keys
- PRING for Pangolin network
Refer to this article to apply for 100 PRINGs from the faucet.
- ORING for Pangoro network
Email your Pangoro address and reason to ran.ji@itering.com
- Subscan API Key for Transaction Cost Oracle
Refer https://docs.api.subscan.io/#introduction to fill out a Google form to apply for a free Subscan API key.
Enrolling by Locking Collateral
Once you’ve created your account and obtained some tokens, you can visit the Substrate portal to connect to the Pangolin network to enroll.
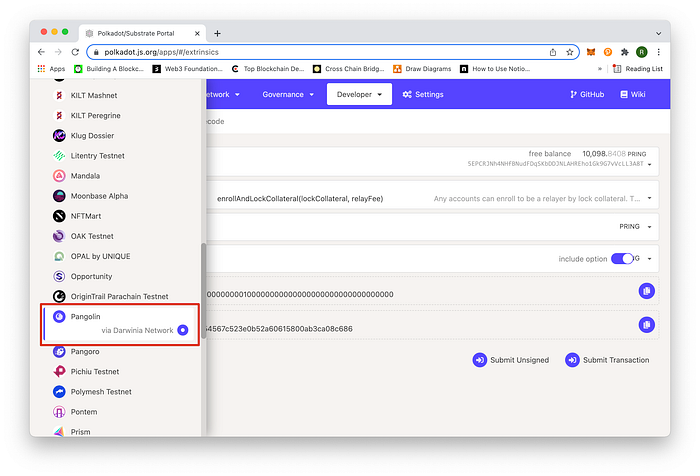
Follow the order on the screenshot below to enroll. You need to specify your own values for lockCollateral and relayFee. The relayFee is the current minimum for relayFee is 15. The more lockCollateral you lock, the more orders you can take simultaneously.

Submit the transaction by signing it, and you become a valid(assigned) relayer on the Pangolin network.
Then switch to the Pangoro network and do exactly the same to become an assigned relayer on the Pangoro network.
Installation
There are multiple ways to install Bridger. You can download and install a binary, build from the source code, or pull a Docker image.
- Download from GitHub releases
Download the binary from latest release. You can also find the VERSION number there, which is a parameter in the following command lines.
- Pull the Docker image
Run the following command.
docker pull quay.io/darwinia-network/bridger:<VERSION>NOTE: You should replace <VERSION> with the latest version number. It is v0.4.8 as of the time the article is published.
- Build from source
$ git clone <https://github.com/darwinia-network/bridger.git>
$ cd bridger/
$ cargo build --release
NOTE: Please use the last nightly toolchain. You might want to change the default toolchain using
rustup default nightly, some bridges need wasm support, you can runrustup target add wasm32-unknown-unknown.
Configuration
The executable bridger will be in the folder target/release if the compilation completes successfully. You are free to move the executable to an appropriate path in your machine.
According to the specific source and target chains, Darwinia Bridger can be configured to different types of relayers. Here we will only demonstrate the configuration for the Pangolin-Ropsten Bridger.
Then create a folder for configuration files and data storage, and copy the template file to the newly-created folder.
$ mkdir ~/.bridger
$ cp .maintain/config/task-pangolin-ropsten.toml ~/.bridger/
Open and edit the file ‘task-pangolin-ropsten.toml’ to set the parameters. The Bridger is a work in progress. Some parameters are for advanced management and some are reserved for future extension. We only cover the minimum necessary parameters here. We recommend you to keep the parameters as they are in the template unless specified here.
- Private key to the account on Pangolin (prvt1)
prvt1 has the format “0x…”
[Pangolin] ... signer= prvt1
- Private key to the account on Pangoro (prvt2)
prvt2 has the format “0x…”
[Pangoro] ... signer= prvt2
- Relay Fee Strategy
[task]
# 1800 seconds, 30 minutes
interval_update_fee = 1800
update_fee_strategy = "Nothing"
The default strategy is Nothing which means your price offer is what you set when you enroll. There are other two predefined strategies available, Crazy and Reasonable.
Under the Crazy mode, you will offer a price of 1 token less than the current lowest price.
Under the Reasonable mode, you update your offer based on the real-time prices and the exchange ratio between tokens on both chains. Such data can be obtained from third-party oracles. If you need to query such data from Subscan, you should apply for an API key and set as follows.
- API Key for Subscan
If you chose the Reasonable strategy, uncomment the Subcan section and use the API key as token. The Subscan API key is a hex number embraced by a pair of quotation marks, like “07acae5ae7a467e091c05d8b840313d4”.
[pangolin_subscan]
endpoint = "https://pangolin.api.subscan.io"
token = subscan_api_key
timeout = 30  [pangoro_subscan]
endpoint = "https://pangoro.api.subscan.io"
token = subscan_api_key
timeout = 30
Running
After setting the parameters correctly, you can continue to start a bridger. You can take a look at the help first.
$ bridger server --help
bridger-server 0.4.8
Start bridger serverUSAGE:
    bridger server [OPTIONS]FLAGS:
        --help       Prints help information
    -V, --version    Prints version informationOPTIONS:
        --base-path <base-path>    The bridger config or data base path
    -h, --host <host>              Bridger service listen host [default: 127.0.0.1]
    -p, --port <port>              Bridger service listen port [default: 1098]
-base-pathAll of bridger data, such as task config and database, will be stored here. The default path is$HOME/.bridger-hostThe host of the bridger server.-portThe port of the bridger server.
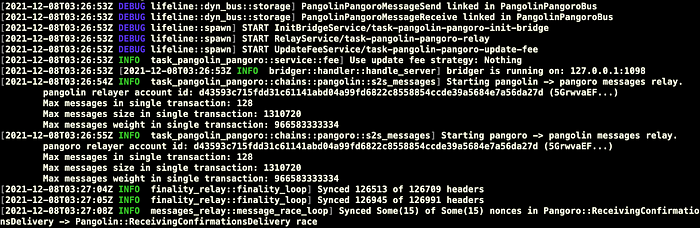
Replace the host and port in the following command with your own to actually start a bridger server.
$ bridger server --host 127.0.0.1 --port 2021If everything goes well, you will see something like that:
Discussion
Once you have familiarized yourself with these operations through the test bridger and fully understand the possible benefits and risks of participating in the relay fee market, you can become a relayer on the main networks (Darwinia-to-Crab) and earn commissions, choosing your strategy according to your risk appetite. To become a Darwinia-to-Crab bridger, you need to copy the template file task-darwinia-crab.toml to the base path and replace the parameters accordingly. Of course, you have to make sure you have some RING in your Darwinia account and some CRAB in your Crab account.
Series Articles:
「Understanding Darwinia Bridge 1–1」Darwinia Relayer Incentive Scheme — Fee Market
「Understanding Darwinia Bridge 1–2」Mapping Token Factory
「Understanding Darwinia Bridge 1–3」The Token Bridge Solution
「Understanding Darwinia Bridge 1–4」The New Message Protocol for the Ethereum-Darwinia Bridge
About Darwinia Network
Darwinia Network is a decentralized cross-chain bridge network building on Substrate, which is the “cross-chain bridge hub” of the Web 3.0 Metaverse. It provides a safe and general bridging solution, connects to Polkadot, Ethereum, TRON, and other heterogeneous chains by cross-chain transfer of assets and remote chain calls.
Darwinia Network has gained high reputation and recognition along the way to build the decentralized cross-chain bridge protocol. In 2020, Darwinia was written in Polkadot light-paper as one of the friends of Polkadot and Substrate. And Darwinia was selected to join Substrate Builder Program and Web3.0 Bootcamp, and for the outstanding work in Substrate Builder Program, Darwinia Network was officially awarded the Level 2 badge by Parity. The products and tools developed by Darwinia have been rewarded three W3F Grants.
Darwinia has been contributing to the compatibility and interoperability of the Metaverse.
The application areas of Darwinia Network include DeFi, cross-chain NFT trading, games, etc. Darwinia also develops the Metaverse game Evolution Land.

